ChartDirector 6.0 (Ruby Edition)

Crosshair with Axis Labels


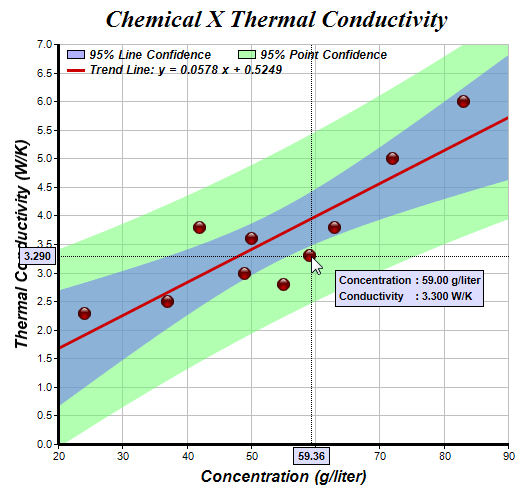
This sample program demonstrates a track cursor programmed as a crosshair cursor with axis labels. In additional, it demonstrates using hot spot events to pop up a box when the mouse is over a data point or the trend line, showing information about these objects with HTML formatting.

The key elements of the server side charting code are as follows:

Source Code Listing

[Ruby On Rails Version - Controller] app/controllers/crosshair_controller.rb
require("chartdirector")

class CrosshairController < ApplicationController
    include ChartDirector::InteractiveChartSupport

    def index()
        @ctrl_file = File.expand_path(__FILE__)

        # The XY data of the first data series
        dataX = [50, 55, 37, 24, 42, 49, 63, 72, 83, 59]
        dataY = [3.6, 2.8, 2.5, 2.3, 3.8, 3.0, 3.8, 5.0, 6.0, 3.3]

        # Create a XYChart object of size 520 x 490 pixels
        c = ChartDirector::XYChart.new(520, 490)

        # Set the plotarea at (60, 40) and of size 450 x 400 pixels, with white background and a
        # light grey border (0xc0c0c0). Turn on both horizontal and vertical grid lines with light
        # grey color (0xc0c0c0)
        c.setPlotArea(60, 40, 450, 400, 0xffffff, -1, 0xc0c0c0, 0xc0c0c0, -1)

        # Add a title to the chart using 18 point Times Bold Itatic font.
        c.addTitle("      Chemical X Thermal Conductivity", "timesbi.ttf", 18)

        # Add titles to the axes using 12pt Arial Bold Italic font
        c.yAxis().setTitle("Thermal Conductivity (W/K)", "arialbi.ttf", 12)
        c.xAxis().setTitle("Concentration (g/liter)", "arialbi.ttf", 12)

        # Set the axes line width to 3 pixels
        c.yAxis().setWidth(3)
        c.xAxis().setWidth(3)

        # Add a scatter layer using (dataX, dataY)
        scatterLayer = c.addScatterLayer(dataX, dataY, "", ChartDirector::GlassSphereShape, 13,
            0xcc0000)

        # Show custom Javascript tooltip for the scatter layer
        scatterLayer.setHTMLImageMap("", "",
            "onmouseover='showDataPointToolTip({x}, {value})' onmouseout='hideToolTip()'")

        # Add a trend line layer for (dataX, dataY)
        trendLayer = c.addTrendLayer2(dataX, dataY, 0xcc0000)

        # Set the line width to 3 pixels
        trendLayer.setLineWidth(3)

        # Add a 95% confidence band for the line
        trendLayer.addConfidenceBand(0.95, 0x806666ff)

        # Add a 95% confidence band (prediction band) for the points
        trendLayer.addPredictionBand(0.95, 0x8066ff66)

        # Show custom Javascript tooltip for the trend layer
        trendLayer.setHTMLImageMap("", "",
            "onmouseover='showTrendLineToolTip({slope}, {intercept})' onmouseout='hideToolTip()'")

        # Add a legend box at (60, 35) (top of the chart) with horizontal layout. Use 10pt Arial
        # Bold Italic font. Set the background and border color to Transparent and use line style
        # legend icons.
        legendBox = c.addLegend(60, 35, false, "arialbi.ttf", 9)
        legendBox.setBackground(ChartDirector::Transparent)
        legendBox.setLineStyleKey(true)

        # Add entries to the legend box
        legendBox.addKey("95% Line Confidence", 0x806666ff)
        legendBox.addKey("95% Point Confidence", 0x8066ff66)
        legendBox.addKey(sprintf("Trend Line: y = %.4f x + %.4f", trendLayer.getSlope(),
            trendLayer.getIntercept()), 0xcc0000, 3)

        # Create the WebChartViewer object
        @viewer = ChartDirector::WebChartViewer.new(request, "chart1")

        # Create the image and save it in a session variable
        session[@viewer.getId()] = c.makeChart2(ChartDirector::PNG)

        # Include tool tip for the chart
        imageMap = c.getHTMLImageMap("")

        # Set the chart URL and image map to the viewer
        @viewer.setImageUrl(url_for(:action => "get_session_data", :id => @viewer.getId(),
            :nocache => rand))
        @viewer.setImageMap(imageMap)

        # Output Javascript chart model to the browser to support tracking cursor
        @viewer.setChartModel(c.getJsChartModel())
    end

end

[Ruby On Rails Version - View] app/views/crosshair/index.html.erb
<!DOCTYPE html>
<html>
<head>
    <title>Crosshair with Axis Labels</title>
    <script type="text/javascript" src="/javascripts/cdjcv.js"></script>
</head>
<body style="margin:5px 0px 0px 5px">
<script type="text/javascript">

//
// Use the window load event to set up the MouseMovePlotArea event handler
//
JsChartViewer.addEventListener(window, 'load', function() {
    var viewer = JsChartViewer.get('<%= @viewer.getId() %>');

    // Draw track cursor when mouse is moving over plotarea. Hide it when mouse leaves plot area.
    viewer.attachHandler(["MouseMovePlotArea", "TouchStartPlotArea", "TouchMovePlotArea", "ChartMove"],
    function(e) {
        this.preventDefault(e);   // Prevent the browser from using touch events for other actions
        crossHairAxisLabel(viewer, viewer.getPlotAreaMouseX(), viewer.getPlotAreaMouseY());
        viewer.setAutoHide("all", ["MouseOutPlotArea", "TouchEndPlotArea"]);
    });
});

//
// Draw cross hair cursor with axis labels
//
function crossHairAxisLabel(viewer, x, y)
{
    // Show cross hair
    viewer.showCrossHair(x, y);

    // The chart, its plot area and axes
    var c = viewer.getChart();
    var xAxis = c.xAxis();
    var yAxis = c.yAxis();

    // The axis label style
    var labelStyle = "padding:2px 4px; font: bold 8pt arial; border:1px solid black;" +
        "background-color:#DDDDFF; -webkit-text-size-adjust:100%;";

    // Draw x-axis label
    var yPos = xAxis.getY() + ((xAxis.getAlignment() == JsChartViewer.Top) ? -2 : 3);
    var alignment = (xAxis.getAlignment() == JsChartViewer.Top) ? JsChartViewer.Bottom : JsChartViewer.Top;
    viewer.showTextBox("xAxisLabel", x, yPos, alignment, c.getXValue(x).toPrecision(4), labelStyle);

    // Draw y-axis label
    var xPos = yAxis.getX() + ((yAxis.getAlignment() == JsChartViewer.Left) ? -2 : 3);
    var alignment = (yAxis.getAlignment() == JsChartViewer.Left) ? JsChartViewer.Right : JsChartViewer.Left;
    viewer.showTextBox("yAxisLabel", xPos, y, alignment, c.getYValue(y, yAxis).toPrecision(4), labelStyle);
}

//
// Show custom tooltip for data points
//
function showDataPointToolTip(x, y)
{
    var viewer = JsChartViewer.get('<%= @viewer.getId() %>');
    viewer.showTextBox("toolTipBox", viewer.getChartMouseX() + 20, viewer.getChartMouseY() + 20, JsChartViewer.TopLeft,
        "<table><tr><td>Concentration</td><td>: " + x.toPrecision(4) +
        " g/liter</td></tr><tr><td>Conductivity</td><td>: " + y.toPrecision(4) + " W/K</td></tr></table>",
        "padding:0px; font:bold 8pt arial; border:1px solid black; background-color:#DDDDFF");
}

//
// Show custom tooltip for the trend line
//
function showTrendLineToolTip(slope, intercept)
{
    var viewer = JsChartViewer.get('<%= @viewer.getId() %>');
    viewer.showTextBox("toolTipBox", viewer.getChartMouseX() + 20, viewer.getChartMouseY() + 20, JsChartViewer.TopLeft,
        "Trend Line: y = " + slope.toFixed(4) + " x + " + intercept.toFixed(4),
        "padding:2px 4px; font:bold 8pt arial; border:1px solid black; background-color:#DDDDFF");
}

//
// Hide custom tooltip
//
function hideToolTip()
{
    var viewer = JsChartViewer.get('<%= @viewer.getId() %>');
    viewer.hideObj("toolTipBox");
}

</script>
<div style="font-size:18pt; font-family:verdana; font-weight:bold">
    Crosshair with Axis Labels
</div>
<hr style="border:solid 1px #000080" />
<div style="font-size:10pt; font-family:verdana; margin-bottom:1.5em">
    <%= link_to "Source Code Listing",
        :controller => "cddemo", :action => "viewsource",
        :ctrl_file => @ctrl_file, :view_file => File.expand_path(__FILE__) %>
</div>
<!-- ****** Here is the chart image ****** -->
<%= raw(@viewer.renderHTML()) %>
</body>
</html>